Abstract
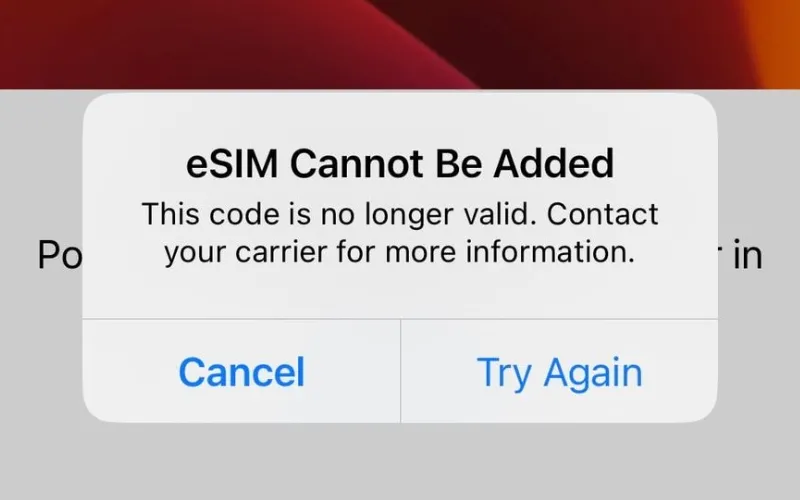
If you’re encountering the “eSIM cannot be added” error when trying to activate an eSIM on your iPhone, don’t worry – it’s a common issue with several possible fixes. The error can occur if the eSIM is already active on another device, the activation code has expired, or due to network settings on your iPhone.
To resolve the problem, first make sure the eSIM is deactivated from any previous devices. If that doesn’t work, try resetting your iPhone’s network settings. You can also try rescanning the eSIM activation QR code. If the error persists, contact your cellular carrier for further assistance.
For a step-by-step walkthrough of the troubleshooting process and more tips on fixing eSIM activation errors, continue reading the full guide below.
Are you trying to set up an eSIM on your iPhone but encountering the frustrating “eSIM cannot be added” error message? Don’t worry, you’re not alone! Many iPhone users have faced this issue when attempting to activate an eSIM for the first time.
The good news is that there are several troubleshooting steps you can take to resolve the problem and get your eSIM up and running smoothly. In this comprehensive guide, we’ll walk you through the process of fixing the “eSIM cannot be added” error step-by-step, so you can start enjoying the benefits of eSIM technology on your iPhone.
eSIM Overview
Before we dive into the troubleshooting, let’s briefly cover what an eSIM is and why you might want to use one. An eSIM, short for embedded SIM, is a digital SIM that allows you to activate a cellular plan from your carrier without needing a physical nano-SIM card. It’s a small chip built into your iPhone that functions just like a traditional SIM.
Apple first introduced eSIM technology in 2018 with the iPhone XS, XS Max, and XR models. Since then, eSIM support has been available on newer iPhones including:
- iPhone 11 series
- iPhone SE (2nd generation)
- iPhone 12 series
- iPhone 13 series
- iPhone 14 series (latest as of March 2024)
- See the complete list of eSIM iPhones
Advantages of eSIM
There are several benefits to using an eSIM over a physical SIM card:
- Convenience: No need to go to a store for a physical SIM. You can sign up for a cellular plan and activate the eSIM right from your iPhone, anywhere you are.
- Multiple plans on a single device: With eSIM, you can have multiple cellular plans active on one iPhone. This is handy if you want separate lines for work and personal use, or if you travel internationally often and want to use local data plans.
- Easy carrier switching: Changing cellular carriers or adding new plans is quick and easy with eSIM. No more obtaining new physical SIM cards each time.
- Enhanced security: An eSIM is more resistant to hacking or cloning compared to a removable physical SIM.
- Saves space: Since the eSIM is embedded in the iPhone’s hardware, it frees up internal space previously used for the SIM card slot. This allows for slimmer phone designs or larger batteries.
Why “eSIM Cannot Be Added” Errors Occur
Now that we’ve covered eSIM basics, let’s address the main issue – the dreaded “eSIM cannot be added” error. This error can appear due to a few reasons:
- The eSIM you’re attempting to activate may already be active on a different device or account. It needs to be deactivated from the previous device first.
- The eSIM activation code (usually a QR code) may have expired. You’ll need to request a new code from your carrier.
- Certain network settings on your iPhone could be interfering with the eSIM activation process.
If you see this error, don’t panic! It’s generally not too complicated to resolve. Let’s go through the troubleshooting steps one by one.
Fixing “eSIM Cannot Be Added” Errors

Follow these steps to troubleshoot and fix the “eSIM cannot be added” error on your iPhone:
Step 1: Delete Previous eSIM
If the eSIM you want to activate was previously active on another iPhone, you must delete it from that device first. Here’s how:
- On your old iPhone, go to Settings > Mobile Data or Settings > Cellular.
- Tap the eSIM plan you want to delete.
- Select Remove Cellular Plan.
- Confirm by tapping Remove.
The eSIM is now deactivated from your previous iPhone. If you no longer have access to that device, contact your carrier to have them deactivate it for you.
Step 2: Reset Network Settings

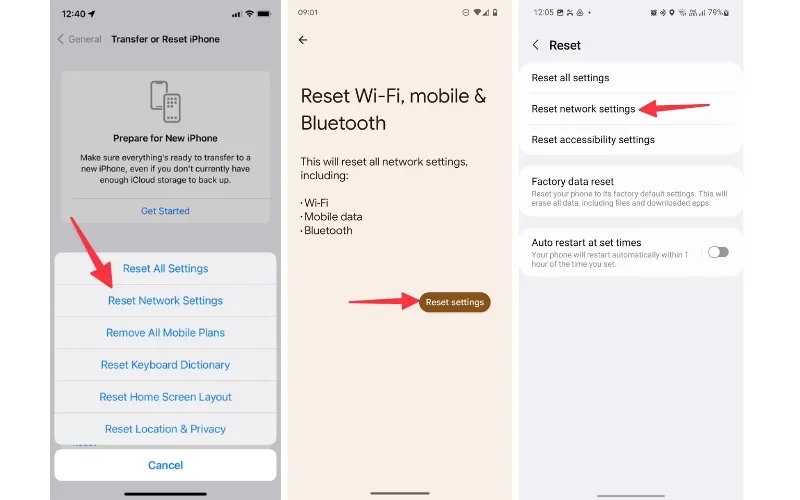
If you deactivated the eSIM from the old device but still can’t add it to your new iPhone, the next step is to reset your network settings. This erases saved Wi-Fi passwords, VPN configurations, and other network preferences, but won’t delete personal data like photos or apps. Here’s what to do:
- On your iPhone, navigate to Settings > General > Transfer or Reset iPhone.
- Select Reset.
- Choose Reset Network Settings. You’ll need to enter your passcode to confirm.
- Your iPhone will restart. Once it powers back on, try activating the eSIM again.
Resetting network settings often allows the eSIM activation to complete successfully without any error messages.
Step 3: Rescan the eSIM QR Code
If you’re still encountering the “eSIM cannot be added this code is no longer valid” error after resetting network settings, carefully check that you’re scanning the correct QR code from your carrier. The code is typically emailed to you or printed on a physical card.
When scanning the QR code, ensure you’re in a well-lit environment and that there’s no glare or smudges obscuring the code or your iPhone’s camera lens. The entire QR code should be clearly visible within the frame on your screen.
If you continue receiving an error that the code is invalid or expired, reach out to your carrier for assistance. They may need to generate a fresh eSIM activation code for you.
Step 4: Contact Your Carrier
If the above troubleshooting steps haven’t resolved the issue and the eSIM still won’t activate, it’s time to contact your cellular provider’s customer support team. They can check their systems for any problems with your eSIM activation and provide further guidance.
Some carriers also offer eSIM activation directly through their mobile apps, so check if that’s an option for a more streamlined process. Their app and website should have detailed instructions for setting up your eSIM and avoiding potential errors.
Additional eSIM Troubleshooting Tips
Here are some more tips and tricks to help if you’re having trouble activating an eSIM on your iPhone:
- Confirm your iPhone is unlocked: To use an eSIM, your iPhone must be unlocked, especially if signing up with a different carrier than the one you originally purchased the device from.
- Verify internet connection: Your iPhone needs to be connected to Wi-Fi or mobile data to complete eSIM activation.
- Check iPhone model compatibility: eSIM won’t work on older iPhones that don’t support the feature. Refer to Apple’s list of eSIM-compatible iPhone models.
- Keep iOS updated: Install the latest iOS updates regularly to prevent bugs and ensure smooth eSIM activation.
- Toggle Airplane Mode: Sometimes simply turning on Airplane Mode, waiting a moment, then turning it back off can resolve eSIM connectivity issues.
- Restart your iPhone: A restart can often fix stubborn problems. Press and hold the side button and a volume button until “slide to power off” appears, then drag the slider. Turn your iPhone back on by holding the side button until the Apple logo shows up.
- Remove physical SIM: If you have a physical SIM card inserted in your iPhone in addition to the eSIM, try removing it and then attempt eSIM activation again.
Future of eSIM Technology
As we move further into 2024 and beyond, eSIM technology is likely to become even more widespread. Many carriers globally already support eSIM activation, and more are adding compatibility all the time.
Rumors suggest that future iPhone models may drop the physical SIM slot entirely in favor of eSIM-only devices. This transition will likely happen gradually, but points toward eSIM being the default SIM technology for smartphones in the coming years.
Having multiple active eSIMs in a single device will also become more common, as people increasingly want the flexibility of separating work and personal lines or having access to local data plans while traveling without needing to swap SIM cards.
Conclusion
While encountering the “eSIM cannot be added” error on your iPhone can be frustrating, it’s usually straightforward to fix by following the troubleshooting steps we’ve outlined: deactivating the eSIM from previous devices, resetting network settings, rescanning the activation code, and if needed, contacting your carrier for assistance.
eSIM technology offers a range of benefits, from the convenience of digital SIM card management to the ability to have multiple cellular plans on a single iPhone. As the telecom industry continues to adopt and improve eSIM support, more consumers will be able to take advantage of the flexibility and features of eSIM.
We hope this guide has helped you resolve any eSIM activation errors you may have encountered on your iPhone. If you have any other questions about using an eSIM, let us know in the comments. Our team is always happy to help our readers make the most of the exciting technology Apple has packed into the latest iPhones!

