Abstract
The SM-DP+ Address is essential for activating and managing eSIMs, linking devices to network providers. It’s obtained either via scanning a QR code or directly from the service provider. Setting it up on iPhone and Android involves entering this address and an activation code in the device’s settings. This process ensures your eSIM works correctly for seamless network connectivity. For a step-by-step guide on setting up your SM-DP+ Address, continue reading below.
Introduction
In the era of digital communication, eSIM technology has emerged as a game-changer, offering a more flexible and convenient alternative to traditional SIM cards. At the heart of eSIM functionality lies the SM-DP+ Address, a critical component that ensures seamless activation and management of your eSIM. This blog post will demystify the SM-DP+ Address and guide you through the setup process.
What is the SM-DP+ Address?
Understanding the Basics
The SM-DP+ Address (Subscription Manager Data Preparation) is a unique identifier that connects your device with eSIM technology to your service provider’s server. It plays a crucial role in the activation, management, and security of your eSIM, ensuring that your device can communicate with the network without any hitches.
Why It Matters
Without the correct SM-DP+ Address, your device cannot authenticate itself with the network provider, leading to activation failures and connectivity issues. It’s the cornerstone of eSIM technology that enables the digital SIM to function correctly on your device.
How to Find the SM-DP+ Address?
Finding your SM DP+ Address is straightforward. You can obtain it through:
- Scanning the QR Code: Usually provided by your service provider, scanning this code with your device will automatically input the SM-DP+ Address.
- Service Provider Documentation: If the QR code is not available, you can request the SM DP Address directly from your service provider, often found in the eSIM activation instructions or sent via email.
Setting Up the SM-DP+ Address
Setting up your SM-DP+ Address is a simple process, but it’s crucial to follow the steps accurately to ensure a successful eSIM activation.
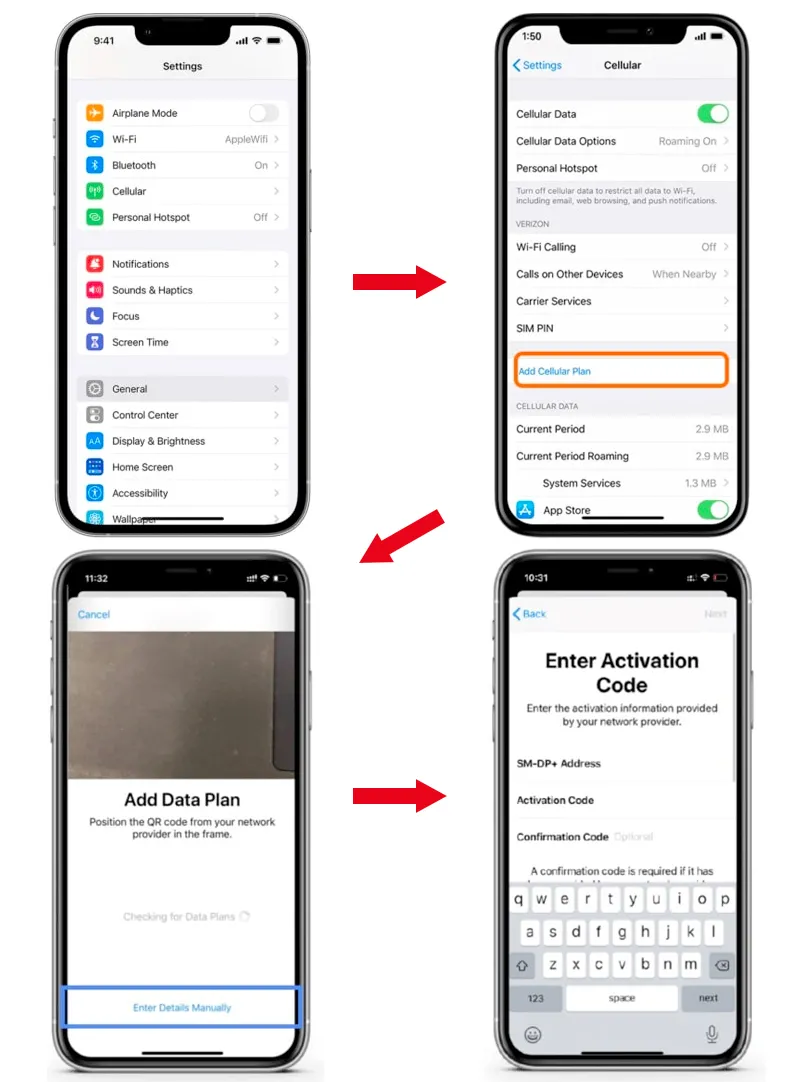
On iPhone
- Open Settings: Go to the ‘Cellular’ or ‘Mobile Data’ section.
- Add Cellular Plan: Tap on ‘Add Cellular Plan’ and choose ‘Enter Details Manually’ at the bottom.
- Enter SM-DP+ Address: Input the SM-DP+ Address and activation code provided by your service provider.
- Complete Setup: Follow the on-screen instructions to finalize the eSIM activation.
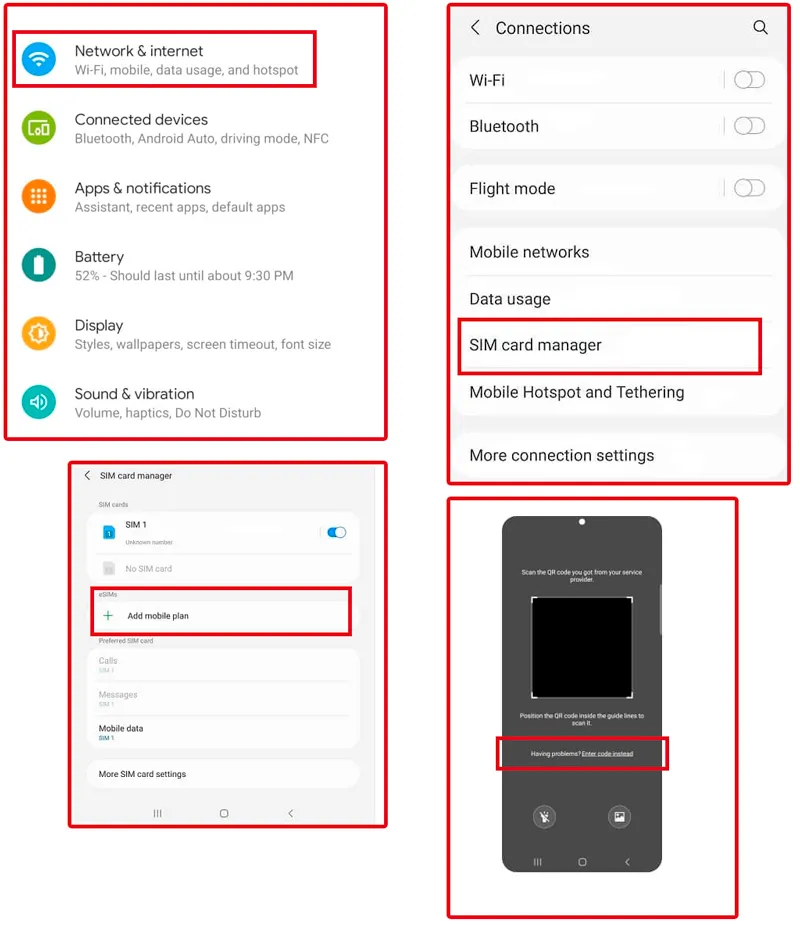
On Android
- Access Settings: Navigate to ‘Network & Internet’ and select ‘Mobile Network’.
- Add a Plan: Choose ‘Add a new plan’ and select ‘Add using SM-DP+ Address and activation code’.
- Manual Entry: Enter the SM-DP+ Address and activation code manually.
- Save and Activate: Follow the prompts to save the settings and activate your eSIM.
Conclusion
The SM-DP+ Address is a vital element in the eSIM ecosystem, ensuring that your digital SIM card operates seamlessly across cellular networks. By understanding what it is and how to set it up, you can take full advantage of the flexibility and convenience offered by eSIM technology. Whether you’re setting up a new device or troubleshooting, knowing how to handle the SM-DP+ Address will keep you connected in the digital age.
Stay connected with eSIMX for the latest in eSIM technology. Subscribe now for updates and tips!
FAQ Of SM DP Address
SM DP+ addresses and activation codes are provided by your eSIM service provider, usually after purchasing an eSIM plan.