Abstract
Transferring an eSIM from one iPhone to another is a simple process that can be completed in a few steps. Here’s a quick summary:
- Prepare Your iPhones: Ensure both devices support eSIM and are connected to Wi-Fi.
- Use the Same Apple ID: Log in with the same Apple ID on both iPhones.
- Initiate Transfer During Setup:
- Turn on your new iPhone and start the setup.
- Connect to Wi-Fi and follow prompts.
- Choose to transfer the eSIM when asked.
- Transfer After Setup:
- Go to ‘Settings’ > ‘Cellular’ on the new iPhone.
- Select ‘Add Cellular Plan’.
- Approve the transfer on the old iPhone.
- Manual Transfer (if needed):
- In ‘Settings’ > ‘Cellular’, choose ‘Add Cellular Plan’.
- Manually enter eSIM details.
- Set Up Dual SIM (optional):
- Configure both a physical SIM and an eSIM, or two eSIMs on compatible iPhones.
For a detailed walkthrough of each step, continue reading below. This guide will ensure a smooth transition to your new iPhone, keeping you connected without any hassle.
Introduction
Welcome to the digital age of SIM cards, where the eSIM reigns supreme! As someone who’s always on the go, I’ve found the eSIM to be a game-changer. It’s not just about convenience; it’s about staying connected in the most efficient way possible. In this article, I’ll guide you through the process of transferring your eSIM from one iPhone to another. Whether you’re upgrading to the latest model or simply switching devices, this guide is your one-stop solution.
What You Need to Prepare
Before diving into the steps, ensure you have the following:
- Two iPhones: Your old iPhone and the new one, both capable of supporting eSIM.
- Wi-Fi Connection: Essential for activating the eSIM on your new iPhone.
- Apple ID: The same Apple ID should be used on both devices for a seamless transfer.
- iOS Version: Ensure both iPhones are running iOS 13.1 or higher.
- Carrier Support: Your carrier must support eSIM technology.
How to Transfer eSIM Step-by-Step
Now that you have a brief overview, let’s dive into the detailed tutorial below, which will guide you through each step of transferring your eSIM from one iPhone to another, ensuring a smooth and hassle-free process.
Method 1: Initiate eSIM Transfer During iPhone Setup
Transferring your eSIM during the initial setup of your new iPhone is the most straightforward method. Here’s how to do it:
- Start Your New iPhone: Power on your new iPhone. You’ll be greeted with a “Hello” screen.
- Begin Setup Process: Swipe up or press the Home button (depending on your iPhone model) to start the setup process.
- Language and Region: Choose your preferred language and select your country or region.
- Connect to Wi-Fi: When prompted, connect your new iPhone to a Wi-Fi network. This step is crucial as it requires an internet connection to transfer the eSIM.
- Data & Privacy: Read through the Data and Privacy information and continue.
- Quick Start: If you have your old iPhone nearby, you can use Quick Start for automatic setup. Place the two iPhones close to each other, and the new iPhone will detect the old one, prompting you to set up the new device using your Apple ID.
- Transfer Cellular Plan: During the setup, look for a message asking if you want to transfer your cellular plans. Tap on the eSIM plan that you wish to transfer from your old iPhone.
- Continue on New iPhone: Tap ‘Continue’ on your new iPhone. If prompted, enter your Apple ID password to authorize the transfer.
- Approval on Old iPhone: On your old iPhone, a message will appear asking if you want to transfer the eSIM to your new iPhone. Tap ‘Transfer’ to confirm.
- Wait for Activation: The eSIM will start activating on your new iPhone. This process may take a few minutes. Once done, your new iPhone will display a confirmation message.
- Finalize Setup: Continue with the rest of the setup steps on your new iPhone, such as setting up Face ID or Touch ID, creating a passcode, and restoring apps and data from iCloud or your old iPhone.
- Check Connectivity: Once the setup is complete, make a test call or use data services to ensure the eSIM is functioning correctly on your new iPhone.
Method 2: Transfer eSIM After iPhone Setup
If you didn’t transfer your eSIM during the initial setup, or if you need to do it at a later time, here’s how to transfer it after your new iPhone is already set up:

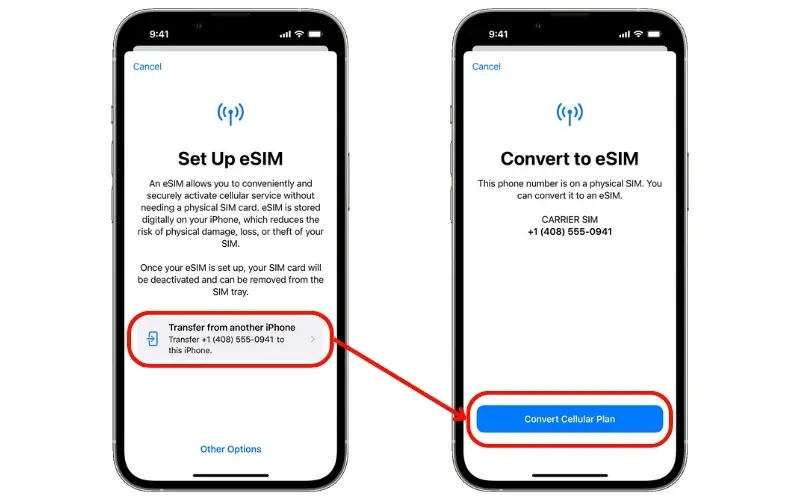
- Access Settings on New iPhone: On your new iPhone, open the ‘Settings’ app.
- Navigate to Cellular Settings: Scroll down and select ‘Cellular’.
- Add Cellular Plan: Tap on ‘Add Cellular Plan’. Your iPhone will search for any eSIMs associated with your Apple ID.
- Select eSIM to Transfer: If your eSIM appears in the list, select it. If it doesn’t appear, ensure both iPhones are using the same Apple ID and are connected to Wi-Fi.
- Approval on Old iPhone: On your old iPhone, a prompt will appear asking if you want to transfer the eSIM to your new iPhone. Confirm by tapping ‘Transfer’.
- Wait for Activation: The transfer process will begin, and your new iPhone will activate the eSIM. This may take a few minutes.
- Confirmation: Once the transfer is complete, you’ll see a confirmation on your new iPhone. You may need to restart the device to complete the activation.
- Test the Connection: Make a call or use data on your new iPhone to ensure the eSIM is working correctly.
Method 3: Manual eSIM Transfer (For Specific Scenarios)
In some cases, you might need to manually transfer your eSIM, such as when automatic transfer isn’t supported or if you’re facing technical issues. Here’s how to do it:
- Contact Your Carrier: Before starting, contact your carrier to get the necessary eSIM information or a QR code for the eSIM.
- Open Settings on New iPhone: Go to the ‘Settings’ app on your new iPhone.
- Go to Cellular Settings: Select ‘Cellular’, then ‘Add Cellular Plan’.
- Manual Entry or QR Code Scan:
- If you have a QR code, use your iPhone’s camera to scan it. Follow the on-screen instructions to add the eSIM.
- If you need to enter details manually, select ‘Enter Details Manually’ at the bottom of the ‘Add Cellular Plan’ screen. Input the information provided by your carrier.
- Activation: After entering the details or scanning the QR code, the eSIM will begin to activate. This process may take a few moments.
- Restart Your iPhone: Once the eSIM is added, you might need to restart your iPhone to complete the setup.
- Verify the eSIM: After restarting, check that the eSIM is active by making a call or using cellular data.
Using Dual SIM on iPhone
If your iPhone model supports Dual SIM functionality, which includes the use of a physical SIM and an eSIM, or two eSIMs, here’s how you can set it up and manage your plans:
- Check iPhone eSIM Compatibility: Ensure your iPhone model supports Dual SIM functionality. This feature is available on iPhone XS, XS Max, XR, and later models.
- Install Physical SIM (if applicable):
- If you’re using a physical SIM along with an eSIM, insert the physical SIM into the SIM tray of your iPhone.
- Ensure the SIM tray is securely closed.
- Set Up eSIM:
- Go to ‘Settings’ > ‘Cellular’.
- Tap ‘Add Cellular Plan’ to add your eSIM. This can be done by scanning a QR code from your carrier or entering the details manually, as mentioned in the previous steps.
- Label Your Plans:
- Once both SIMs are installed, you can label them for easy identification. For example, you might label one as ‘Personal’ and the other as ‘Work’.
- Go to ‘Settings’ > ‘Cellular’, tap the plan you want to rename, then tap ‘Cellular Plan Label’ and select a new label or enter a custom label.
- Select Default Line:
- Choose a default line for calls and messages. This is the line that will be used when you call or message someone who isn’t in your Contacts.
- Go to ‘Settings’ > ‘Cellular’, then tap ‘Default Voice Line’ and select the line you wish to use as your default.
- Manage Cellular Data:
- You can choose which line uses cellular data. Note that while using Dual SIM, only one line can use cellular data at a time.
- To switch cellular data between your lines, go to ‘Settings’ > ‘Cellular’, then tap ‘Cellular Data’ and select the line you want to use for data.
- Enable Data Switching (optional):
- If you want your iPhone to switch cellular data lines automatically when one line is on a call, you can enable ‘Allow Cellular Data Switching’ in the Cellular settings.
- This is useful if you need to maintain an internet connection while on a call.
- Manage Roaming:
- If you travel internationally, you can control data roaming for each line separately. Go to ‘Settings’ > ‘Cellular’, select the plan, then turn on or off ‘Data Roaming’.
- Test Both Lines:
- Make sure to test both lines by making calls, sending messages, and using data. This ensures that both lines are active and functioning correctly.
Conclusion
Transferring your eSIM from one iPhone to another is a straightforward process that enhances your connectivity experience. As someone who values efficiency and staying connected, I find this technology incredibly useful. Did you find this tutorial helpful? Your feedback is important to me, and I encourage you to share your thoughts in the comments. If you liked this guide, please feel free to share it with others who might benefit from it. Stay connected with eSIMX effortlessly!
FAQ Of Transfer eSIM to New iPhone
Yes, you can transfer an eSIM from one iPhone to another. This can be done during the initial setup of your new iPhone or after the setup is complete. The process involves either transferring the eSIM directly from your old iPhone to the new one or using an eSIM QR code provided by your carrier.